Circu’s blog is going to get a little bit DIY over here, this article it’s a do it yourself: cloud bookshelf ledges. just put a fun twist on it! These bookshelves are available in Land of Nod, but the shelves were $39 each, but you can build all 3 of these for under $30!
This is an easy DIY project too, it takes you less than 2 hours to build and paint!
You may also like: AN AMAZING FAIRY TALE BEDROOM
SUPPLIES:
(1) 8ft 1×4 board
(1) 3/4in 4×8 piece of MDF
2-inch screws
tape measurer
sander
jigsaw
compound miter saw
nail gun
drill
white paint
wood filler
ceiling hooks (optional)
Don’t let the supply list scare you, because it is really easy to build these.
The first thing you want to do is decide how long you want your cloud bookshelf ledges to be. In this case, the option was 2ft wide shelves and 3 of them total. You should use the compound miter saw to cut the 1×4 board into (3) 2ft boards. Then, sanded the edges.

Next trace out the large clouds on the MDF board (the 4×8 board is WAY more than you’ll need for this project, expect lots of leftovers). For the cloud drawing, you can have a template for it or simply wing it. You can Google “cloud clip art” to get some ideas for shapes.
In this case, the clouds are a little smaller than the 1×4 boards that were cut in the beginning so the bottom length of the cloud was 22 inches total. Mark your MDF and draw your large clouds from those lines. Hint: draw one large cloud, cut it with your jigsaw, then use it to trace the other large clouds.

Once you have all 3 large clouds cut with your jigsaw you’ll want to cut your 3 smaller clouds (draw these clouds at 16 inches wide each). Don’t worry if your shape looks a little rough after cutting, use your power sander to smooth out the edges.

Once you have everything cut it’s time to put the shelves together. Lay the 1×4 down on a flat surface. Place the large cloud behind it, flat side down flush with the 1×4 board. Use your 2-inch screws to attach the cloud to the board (we used 4 screws in each).

Then line up your small cloud to the front of the 1×4 board and attach with your nail gun.

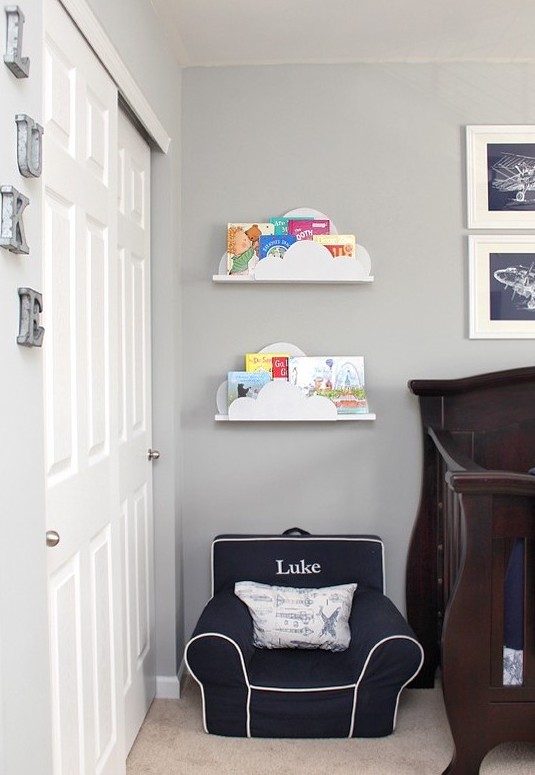
Since in this case they built 3 bookshelf ledges and used the same large and small clouds as templates for all 3, on one of the bookshelf ledges one of the clouds was flipped so they faced in the other direction. You can see below the two right bookshelves are the same and the one on the left is the opposite.

Paint the cloud bookshelf ledges white and let dry. To hang, use a stud finder to find your stud. Then drill a part of the large cloud directly into the stud and countersink your screws. Use a little wood filler to fill the gap and touch up with white paint.

What do you think of this projec? Pretty cool, right?
SEE MORE: HOW TO ORGANIZE A KIDS CLOSET
Follow Circu’s fantasy world:
Facebook | Pinterest | Twitter | Google Plus | Instagram | Youtube | Linkedin | Houzz
Source: howtonestforless.com
[Photography: howtonestforless.com]